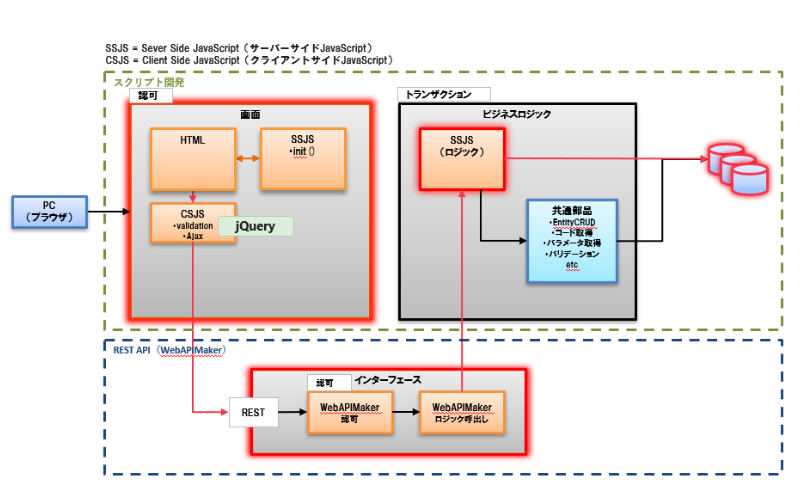
Step5. DBから値を取得して一覧表示する
STEP5では、STEP4にてデータベースに登録したデータを、画面に一覧表示してみましょう。

画面の初期表示時に、データベースから値を取得して一覧に表示します。

画面を修正する(dev_tour.html)
HTMLファイルを修正します。
- %プロジェクト名%/src/main/jssp/src/ssfa_tour/pages/dev_tour/dev_tour.html
<div class="ssfa-list-menu ssfa-list-menu--expand">...</div>の中を修正します。
<div class="ssfa-list-menu ssfa-list-menu--expand">
    <!-- STEP5開始 -->
     <div id="devTour_section4" class="ssfa-content"  style="padding:0.75rem;width:108rem; margin: 0rem auto 0rem auto">
     <div class="ssfa-content-block ssfa-item-margin-top ssfa-animation--fadein-5"style="flex:1">
            <ul class="ssfa-content-block__title" >
                 <li>STEP5:DBから値を取得して一覧表示する</li>
            </ul>
            <div class="ssfa-content-block__item-area" >
                <!-- 任意でテーブルのスタイルを追加 -->
                <style>
                .custom-table {
                    width: 100%;
                    border-collapse: collapse;
                }

                .custom-table th, .custom-table td {
                    border: 1px solid #ddd;
                    padding: 8px;
                    text-align: left;
                }

                .custom-table th {
                    background-color: #f2f2f2;
                }
                </style>
                <!-- 一覧テーブルを生成 -->
                <body>
                <table class="custom-table" id="dev-table">
                    <thead>
                        <tr>
                            <th>名前</th>
                            <th>メモ</th>
                        </tr>
                    </thead>
                    <tbody>
                        <!-- ここにデータが追加される -->
                    </tbody>
                </table>
                </body>
        </div>
    </div>
    </div>
    <!-- STEP5終了 -->
</div>
クライアントサイド処理(dev_tour.js)を修正する
画面表示時に、REST APIを呼び出してサーバーサイドの一覧取得処理を実行するようにイベントを設定します。
データが1件以上取得できた場合、一覧にデータを表示させる処理を記述します。
また、REST APIの実行に失敗した場合「一覧の取得に失敗しました」のメッセージを画面に表示させます。
- %プロジェクト名%/src/main/public/ssfa_tour/csjs/pages/dev_tour/dev_tour.js
STEP4の記述の��後に下記追加します。
/**STEP4の下に追加する**/
/**STEP5開始**/
$(function(){
   let tableBody = document.querySelector("#dev-table tbody");

   //REST APIを呼び出してサーバーサイドからレスポンスを取得する
   let listResult = scmnAjaxRestGetData("api/dps/ssfa_tour/v1/get_list_step_five", false, {});
   if (listResult.error) {
       imuiShowErrorMessage("一覧の取得に失敗しました");
       return;
   }
   if (listResult.data.length > 0) {
       // データがある場合、一覧に表示する
       for (let i = 0; i < listResult.data.length; i++) {
           let row = listResult.data[i];
           let tr = document.createElement("tr");

           let name = document.createElement("td");
           name.textContent = row.name || ""; // 名前
           tr.appendChild(name);

           let memo = document.createElement("td");
           memo.textContent = row.memo || ""; // メモ
           tr.appendChild(memo);

           tableBody.appendChild(tr);
       };
   };
});
/**STEP5終了**/
REST APIの呼び出しは、本製品の内部APIscmnAjaxRestGetData関数を利用しています。
scmnAjaxRestGetDataは、 jQuery.ajaxをラッピングしている関数です。
関数の詳細については、デプロイ済み環境の以下ファイルを参照してください。
- /resin-pro-4.0.xx/webapps/%コンテキストパス%/scmn/csjs/common.js
サーバーサイド処理を作成する
1. SQLの作成
STEP4で登録したデータを全件取得するためのSQLを作成します。
以下の階層でファイルを作成してください。
- %プロジェクト名%/src/main/jssp/src/ssfa_tour/pages/dev_tour/sql/get_list_step_five.sql
SELECT *
FROM dev_tour
2. ロジックの作成(get_list_step_five.js)
SQLを実行し、一覧データを取得するサーバーサイド処理を作成します。
以下の階層でファイルを作成してください。
- %プロジェクト名%/src/main/jssp/src/ssfa_tour/pages/dev_tour/logic/get_list_step_five.js
function GetListStepFive(param){
   //取得処理を実行する
   let database = new TenantDatabase();
   let result = database.executeByTemplate('ssfa_tour/pages/dev_tour/sql/get_list_step_five', {});
   //データベース操作でエラーが出た場合、エラーを返却する
   if (result.error) {
	   return {'error': result.error, 'errorMessage': result.errorMessage};
   }
   //取得に成功した場合、取得情報を返却する
	return {'error': false, 'data': result.data};
}
REST APIを作成する
Step4と同様の手順で作成します。
1. パラメーターおよびレスポンスを定義
まず、クライアントサイドからサーバーサイドに渡すパラメーターを定義します。
以下の階層でファイルを作成してください。
- %プロジェクト名%/src/main/ java/jp/co/intra_mart/dev/ssfa_tour/webapi/dev_tour/model/GetListStepFiveParam.java
package jp.co.intra_mart.dev.ssfa_tour.webapi.dev_tour.model;

import com.fasterxml.jackson.annotation.JsonIgnoreProperties;

@JsonIgnoreProperties(ignoreUnknown = true)
@lombok.Data
public class GetListStepFiveParam {
    //サーバーサイドに渡す値がある場合はここに記載する
}
次に、サーバーサイドからクライアントサイドに処理結果を返却する際のレスポンスを定義します。
以下の階層でファイルを作成してください。
- %プロジェクト名%/src/main/ java/jp/co/intra_mart/dev/ssfa_tour/webapi/dev_tour/model/GetListStepFiveResult.java
package jp.co.intra_mart.dev.ssfa_tour.webapi.dev_tour.model;

import com.fasterxml.jackson.annotation.JsonIgnoreProperties;

@JsonIgnoreProperties(ignoreUnknown = true)
@lombok.Data
public class GetListStepFiveResult {

    private Boolean error;
    private String errorMessage;
    private Data[] data;

    @JsonIgnoreProperties(ignoreUnknown = true)
    @lombok.Data
    public static class Data {

        private String name;
        private String memo;

    }
}
2. サービスインタフェースの作成
ServiceInterfaceクラスを作成し、REST APIの基本的な仕様を決定します。
以下の階層でファイルを作成してください。
- %プロジェクト名%/src/main/ java/jp/co/intra_mart/dev/ssfa_tour/webapi/dev_tour/GetListStepFiveServiceInterface.java
package jp.co.intra_mart.dev.ssfa_tour.webapi.dev_tour;

import jp.co.intra_mart.foundation.web_api_maker.annotation.Body;
import jp.co.intra_mart.foundation.web_api_maker.annotation.IMAuthentication;
import jp.co.intra_mart.foundation.web_api_maker.annotation.POST;
import jp.co.intra_mart.foundation.web_api_maker.annotation.Path;
import jp.co.intra_mart.foundation.web_api_maker.annotation.PreventWritingResponse;
import jp.co.intra_mart.foundation.web_api_maker.annotation.Required;
import jp.co.intra_mart.sol.common.proxy.annotation.ScmnService;
import jp.co.intra_mart.sol.common.webapi.exception.ExecuteJsException;
import jp.co.intra_mart.dev.ssfa_tour.webapi.dev_tour.model.GetListStepFiveParam;
import jp.co.intra_mart.dev.ssfa_tour.webapi.dev_tour.model.GetListStepFiveResult;

@IMAuthentication
@ScmnService(concretizedClass = GetListStepFiveService.class)
public interface GetListStepFiveServiceInterface {

    @Path("/api/dps/ssfa_tour/v1/get_list_step_five")
    @POST
    @PreventWritingResponse
    public GetListStepFiveResult execute(@Required @Body final GetListStepFiveParam input) throws ExecuteJsException;

}
3. サービスの作成
Serviceクラスでは、REST APIを通して実行するSSJS(ロジック)を決定します。
以下の階層でファイルを作成してください。
- %プロジェクト名%/src/main/ java/jp/co/intra_mart/dev/ssfa_tour/webapi/dev_tour/GetListStepFiveService.java
package jp.co.intra_mart.dev.ssfa_tour.webapi.dev_tour;

import jp.co.intra_mart.sol.common.webapi.exception.ExecuteJsException;
import jp.co.intra_mart.dev.ssfa_tour.webapi.dev_tour.model.GetListStepFiveParam;
import jp.co.intra_mart.dev.ssfa_tour.webapi.dev_tour.model.GetListStepFiveResult;
import jp.co.intra_mart.sol.common.webapi.utils.JsUtils;

public class GetListStepFiveService implements GetListStepFiveServiceInterface {

    public GetListStepFiveResult execute(final GetListStepFiveParam input) throws ExecuteJsException {
        return JsUtils.executeJs("ssfa_tour/pages/dev_tour/logic/get_list_step_five", "GetListStepFive", input, GetListStepFiveResult.class);
    }
}
4. サービスファクトリの作成
ServiceFactoryクラスでは、ファクトリクラスおよびサービスクラスのインスタンスを生成します。
以下の階層でファイルを作成してください。
- %プロジェクト名%/src/main/ java/jp/co/intra_mart/dev/ssfa_tour/webapi/dev_tour/GetListStepFiveServiceFactory.java
package jp.co.intra_mart.dev.ssfa_tour.webapi.dev_tour;

import jp.co.intra_mart.foundation.web_api_maker.annotation.ProvideFactory;
import jp.co.intra_mart.foundation.web_api_maker.annotation.ProvideService;
import jp.co.intra_mart.foundation.web_api_maker.annotation.WebAPIMaker;
import jp.co.intra_mart.sol.common.proxy.ScmnServiceFactory;

@WebAPIMaker
public class GetListStepFiveServiceFactory {

    @ProvideFactory
    public static GetListStepFiveServiceFactory getFactory() {
        return new GetListStepFiveServiceFactory();
    }

    @ProvideService
    public GetListStepFiveServiceInterface getService() {
        return ScmnServiceFactory.getInstance(GetListStepFiveServiceInterface.class);
    }
}
上記が完了したら、新規作成したjavaを読み込むために、一度サーバーを再起動します。
REST API作成には、iAPが提供する「Web API Maker」を利用しています。
詳細は、「REST APIによるサーバー・クライアント間の通信処理」を参照してください。
REST APIの認可を設定する
STEP3と同様の手順で、REST API実行の認可を設定します。
1. 認可のリソースを登録する
-
テナント管理者でログインします。
-
「サイトマップ」→「テナント管理」→「認可」を開きます。
-
リソースの種類を「DPS」に変更します。
-
「権限設定を開始する」を押下します。
リソース列の 「DPS」 にマウスカーソルを合わせ、右側に表示されるアイコンを押下します。 -
「リソースの詳細」 ダイアログの 「配下にリソースを新規作成」 を押下し、以下を入力して「OK」を押下します。
項目 値 リソースグループID get_list_step_five リソースグループ名 【開発ツアー】一覧取得 リソースURI service://api/dps/ssfa_tour/v1/get_list_step_five 設定補足「リソースURI」は、サービスインタフェース(GetListStepFiveServiceInterface.java)で指定した@Pathに
service:/を付加した値を設定します。
2. リソースに対して権限を設定する
1で登録したリソースに対し、権限を設定します。
-
テナント管理者でログインします。
-
「サイトマップ」→「テナント管理」→「認可」を開きます。
-
リソースの種類を「DPS」に変更します。
-
画面左上の 「検索」 アイコンを押下します。
「リソース(縦軸)の絞込」 のテキストボックスに 「ツアー」 を入力して 「検索」 します。 -
「権限設定を開始する」ボタンを押下します。
-
「【開発ツアー】一覧取得」 の行と 「SFA編集ユーザ」 の列が交わるセルをクリックして、緑色のチェックに変更します。
これでREST APIにアクセスするための認可の設定は完了です。
動作を確認する
画面初期表示時に、登録済みのデータが一覧表示されれば成功です。
登録データがない場合は、一覧のヘッダーのみが表示されます。