Step3. サーバサイドから取得した値を画面表示する
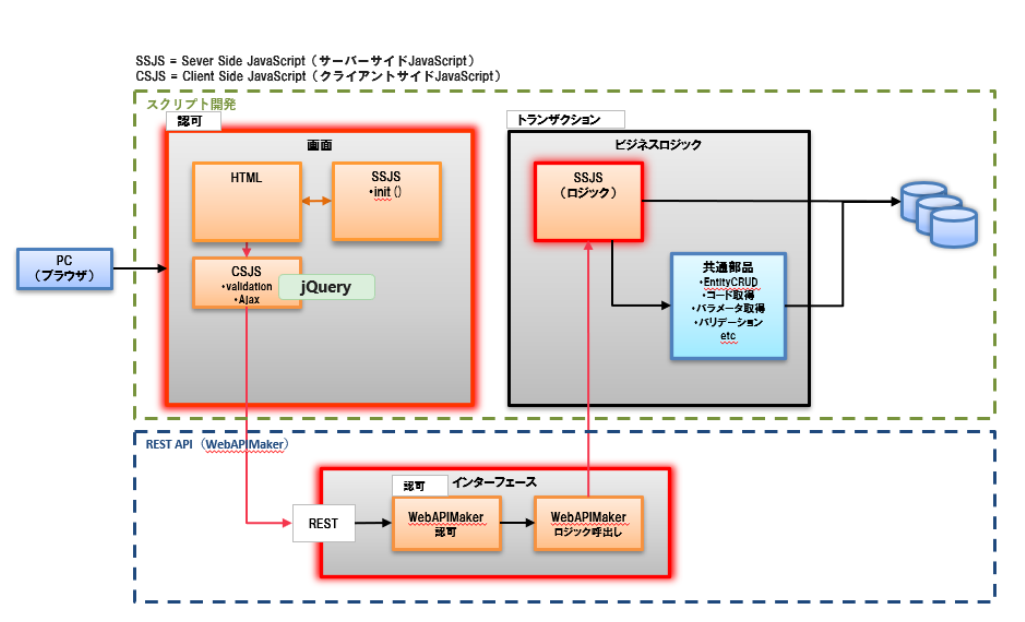
STEP3では、赤枠の部分を作成します。
サーバーサイドJavaScript(SSJS)ファイルを作成し、サーバサイドとクライアントサイドでデータのやりとりを実装してみましょう。
ここでは、サーバーサイドJavaScript(SSJS)に「Hello World」という固定の文字を返す処理を記述します。
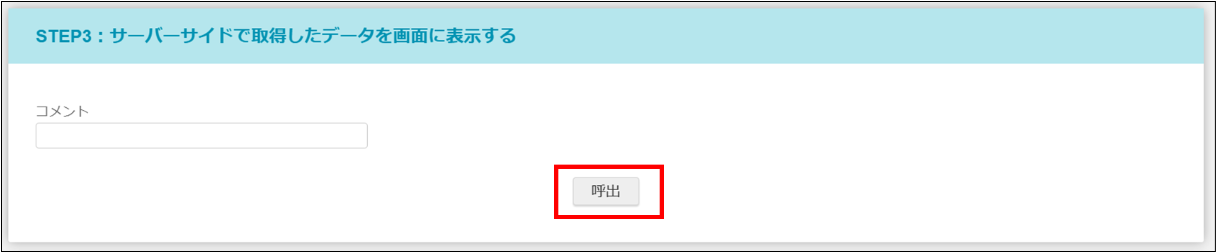
画面上の呼出ボタンをクリックすると、サーバーサイドJavaScript(SSJS)が呼び出され、「Hello World」が画面に表示されるように��実装します。
画面を修正する(dev_tour.html)
HTMLファイルを修正します。
- %プロジェクト名%/src/main/jssp/src/ssfa_tour/pages/dev_tour/dev_tour.html
<div class="ssfa-list-menu ssfa-list-menu--expand">...</div>の中を修正します。
<div class="ssfa-list-menu ssfa-list-menu--expand">
     <!-- STEP2のブロックの下に以下を追加する -->
     <!-- STEP3開始 -->
     <div id="devTour_section3" class="ssfa-content"  style="padding:0.75rem;width:108rem; margin: 0rem auto 0rem auto">
     <div class="ssfa-content-block ssfa-item-margin-top ssfa-animation--fadein-5"style="flex:1">
            <ul class="ssfa-content-block__title" >
                 <li>STEP3:サーバーサイドで取得したデータを画面に表示する</li>
             </ul>
             <div class="ssfa-content-block__item-area" >
                 <!-- コメント(入力不可) -->
                 <div class="ssfa-item-margin--bottom">
	                 <div class="ssfa-item-area--col">
	                    <label class="ssfa-item-label">コメント</label>
	                       <div class="ssfa-item-value" style="margin-right: 0; width: 300px;">
	                       <imart type="imuiTextbox" id="devTour_comment_display" name="devTour_comment_display" readonly/>
	                       </div>
	                  </div>
                 </div>
             <!-- ボタン -->
             <div class="ssfa-flex ssfa-item-margin--all">
                 <div class="ssfa-item-area--col" style="flex:1; text-align: center;">
                     <imart type="imuiButton" id="devTour_get" value="呼出"
                         class="imui-small-button"/>
                 </div>
             </div>
             </div>
     </div>
     </div>
     <!-- STEP3終了 -->
</div>
クライアントサイド処理(dev_tour.js)を修正する
呼出ボタンがクリックされた時に、REST APIを呼び出してサーバーサイドの処理を実行するようにイベントを設定します。
- %プロジェクト名%/src/main/public/ssfa_tour/csjs/pages/dev_tour/dev_tour.js
STEP2の記述の後に下記追加します。
/**STEP2の下に追加する**/
/**STEP3開始**/
// 呼出ボタンクリックイベント登録
$(document).on('click', '#devTour_get', function () {
	//REST APIを呼び出してサーバーサイドからレスポンスを取得する
    let getResult = scmnAjaxRestGetData("api/dps/ssfa_tour/v1/get_comment_step_three", false, {});
	// コメントに、サーバーサイドから取得した値を設定する
	$("#devTour_comment_display").val(getResult.comment_display);
 });
 /**STEP3終了**/
REST APIの呼び出しは、本製品の内部APIscmnAjaxRestGetData関数を利用しています。
scmnAjaxRestGetDataは、 jQuery.ajaxをラッピングしている関数です。
関数の詳細については、デプロイ済み環境の以下ファイルを参照してください。
- /resin-pro-4.0.xx/webapps/%コンテキストパス%/scmn/csjs/common.js
サーバーサイド処理(get_comment_step_three.js)を作成する
"Hello World"という文字を返すサーバーサイド処理を作成します。
以下の階層でファイルを作成してください。
- %プロジェクト名%/src/main/jssp/src/ssfa_tour/pages/dev_tour/logic/get_comment_step_three.js
function GetCommentStepThree(param){
    //comment_displayに返却値を格納する
	return {comment_display : "Hello World"}
}
REST APIを作成する
1. パラメーターおよびレスポンスを定義
まず、クライアント��サイドからサーバーサイドに渡すパラメーターを定義します。
以下の階層でファイルを作成してください。
- %プロジェクト名%/src/main/ java/jp/co/intra_mart/dev/ssfa_tour/webapi/dev_tour/model/GetCommentStepThreeParam.java
本ステップでは、画面から渡す情報はないため、パラメーターは記載しません。
package jp.co.intra_mart.dev.ssfa_tour.webapi.dev_tour.model;

import com.fasterxml.jackson.annotation.JsonIgnoreProperties;

@JsonIgnoreProperties(ignoreUnknown = true)
@lombok.Data
public class GetCommentStepThreeParam {
    //クラインアントサイドからサーバーサイドに渡す値がある場合はここに記載する
}
次に、サーバーサイドからクライアントサイドに処理結果を返却する際のレスポンスを定義します。
以下の階層でファイルを作成してください。
- %プロジェクト名%/src/main/ java/jp/co/intra_mart/dev/ssfa_tour/webapi/dev_tour/model/GetCommentStepThreeResult.java
package jp.co.intra_mart.dev.ssfa_tour.webapi.dev_tour.model;

import com.fasterxml.jackson.annotation.JsonIgnoreProperties;

@JsonIgnoreProperties(ignoreUnknown = true)
@lombok.Data
public class GetCommentStepThreeResult {
    //get_comment_step_three.jsでreturnしたい値の形に合わせて定義します
	//今回は、comment_displayをクライアント側に返す
    private String comment_display;
}
2. サービスインタフェースの作成
ServiceInterfaceクラスを作成し、REST APIの基本的な仕様を決定します。
以下の階層でファイルを作成してください。
- %プロジェクト名%/src/main/ java/jp/co/intra_mart/dev/ssfa_tour/webapi/dev_tour/GetCommentStepThreeServiceInterface.java
package jp.co.intra_mart.dev.ssfa_tour.webapi.dev_tour;

import jp.co.intra_mart.foundation.web_api_maker.annotation.Body;
import jp.co.intra_mart.foundation.web_api_maker.annotation.IMAuthentication;
import jp.co.intra_mart.foundation.web_api_maker.annotation.POST;
import jp.co.intra_mart.foundation.web_api_maker.annotation.Path;
import jp.co.intra_mart.foundation.web_api_maker.annotation.PreventWritingResponse;
import jp.co.intra_mart.foundation.web_api_maker.annotation.Required;
import jp.co.intra_mart.sol.common.proxy.annotation.ScmnService;
import jp.co.intra_mart.sol.common.webapi.exception.ExecuteJsException;
import jp.co.intra_mart.dev.ssfa_tour.webapi.dev_tour.model.GetCommentStepThreeParam;
import jp.co.intra_mart.dev.ssfa_tour.webapi.dev_tour.model.GetCommentStepThreeResult;

@IMAuthentication
@ScmnService(concretizedClass = GetCommentStepThreeService.class)
public interface GetCommentStepThreeServiceInterface {

    @Path("/api/dps/ssfa_tour/v1/get_comment_step_three")
    @POST
    @PreventWritingResponse
    public GetCommentStepThreeResult execute(@Required @Body final GetCommentStepThreeParam input) throws ExecuteJsException;

}
3. サービスの作成
Serviceクラスでは、REST APIを通して実行するSSJS(ロジック)を決定します。
以下の階層でファイルを作成してください。
- %プロジェクト名%/src/main/ java/jp/co/intra_mart/dev/ssfa_tour/webapi/dev_tour/GetCommentStepThreeService.java
package jp.co.intra_mart.dev.ssfa_tour.webapi.dev_tour;

import jp.co.intra_mart.sol.common.webapi.exception.ExecuteJsException;
import jp.co.intra_mart.dev.ssfa_tour.webapi.dev_tour.model.GetCommentStepThreeParam;
import jp.co.intra_mart.dev.ssfa_tour.webapi.dev_tour.model.GetCommentStepThreeResult;
import jp.co.intra_mart.sol.common.webapi.utils.JsUtils;

public class GetCommentStepThreeService implements GetCommentStepThreeServiceInterface {

    public GetCommentStepThreeResult execute(final GetCommentStepThreeParam input) throws ExecuteJsException {
        return JsUtils.executeJs("ssfa_tour/pages/dev_tour/logic/get_comment_step_three", "GetCommentStepThree", input, GetCommentStepThreeResult.class);
    }
}
4. サービスファクトリの作成
ServiceFactoryクラスでは、ファクトリクラスおよびサービスクラスのインスタンスを生成します。
以下の階層でファイルを作成してください。
- %プロジェクト名%/src/main/ java/jp/co/intra_mart/dev/ssfa_tour/webapi/dev_tour/GetCommentStepThreeServiceFactory.java
package jp.co.intra_mart.dev.ssfa_tour.webapi.dev_tour;

import jp.co.intra_mart.foundation.web_api_maker.annotation.ProvideFactory;
import jp.co.intra_mart.foundation.web_api_maker.annotation.ProvideService;
import jp.co.intra_mart.foundation.web_api_maker.annotation.WebAPIMaker;
import jp.co.intra_mart.sol.common.proxy.ScmnServiceFactory;

@WebAPIMaker
public class GetCommentStepThreeServiceFactory {

    @ProvideFactory
    public static GetCommentStepThreeServiceFactory getFactory() {
        return new GetCommentStepThreeServiceFactory();
    }

    @ProvideService
    public GetCommentStepThreeServiceInterface getService() {
        return ScmnServiceFactory.getInstance(GetCommentStepThreeServiceInterface.class);
    }
}
5. パッケージの登録
クラスパスに @WebAPIMaker が付与されたファクトリクラス(手順4で作成)のパッケージを列挙したファイルを配置します。
以下の階層でテキストファイルを作成してください。
- %プロジェクト名%/src/main/resources/META-INF/im_web_api_maker/packages
jp.co.intra_mart.dev.ssfa_tour.webapi
上記が完了したら、新規作成したjavaを読み込むために、一度サーバーを再起動します。
REST API作成には、iAPが提供する「Web API Maker」を利用しています。
詳細は、「REST APIによるサーバー・クライアント間の通信処理」を参照してください。
REST APIの認可を設定する
REST API実行の認可を設定します。
1. 認可のリソースを登録する
-
テナント管理者でログインします。
-
「サイトマップ」→「テナント管理」→「認可」を開きます。
-
リソースの種類を「DPS」に変更します。
-
「権限設定を開�始する」を押下します。
リソース列の 「DPS」 にマウスカーソルを合わせ、右側に表示されるアイコンを押下します。 -
「リソースの詳細」 ダイアログの 「配下にリソースを新規作成」 を押下し、以下を入力して「OK」を押下します。
項目 値 リソースグループID get_comment_step_three リソースグループ名 【開発ツアー】コメント取得 リソースURI service://api/dps/ssfa_tour/v1/get_comment_step_three 設定補足「リソースURI」は、サービスインタフェース(GetCommentStepThreeServiceInterface.java)で指定した@Pathに
service:/を付加した値を設定します。
2. リソースに対して権限を設定する
1で登録したリソースに対し、権限を設定します。
-
テナント管理者でログインします。
-
「サイトマップ」→「テナント管理」→「認可」を開きます。
-
リソースの種類を「DPS」に�変更します。
-
画面左上の 「検索」 アイコンを押下します。
「リソース(縦軸)の絞込」 のテキストボックスに 「ツアー」 を入力して 「検索」 します。 -
「権限設定を開始する」ボタンを押下します。
-
「【開発ツアー】コメント取得」 の行と 「SFA編集ユーザ」 の列が交わるセルをクリックして、緑色のチェックに変更します。
これでREST APIにアクセスするための認可の設定は完了です。
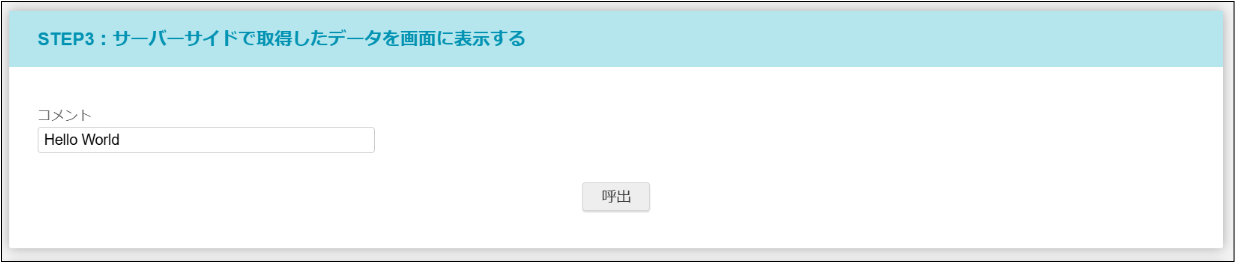
動作を確認する
「呼出」ボタンをクリックしてみましょう。
コメントに「Hello World」と表示されれば成功です!